Friday, March 10, 2017

Project Nr 8: Bench Cabinet

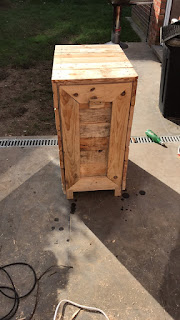
Allright, A whole day free, and good weather. Finished the garbage bin. Next thing, I want a cabinet to put Wolf's bench in, with a multi-purpose top, flush with the bin and cabinet in my utility room.
Using the same 4.5x4.5 and pallet wood. 
Starting off with the frame, making sure I keep a 7cm clearance from the floor, so cleaning is not an issue anymore. Here we go:


With a litlle help of my friend ;-)


That worked out really fine. This time everything is flush and right! (and tight as well)
Sorting out the right boards to use for the upper surface. I want it to be flat, so I can use it for multiple purposes. The lower shelf was contstructed in the same manner I did with my side-table (project Nr. 1)


I ran out of woodlovers teak-oil-spay. So I'll assamble it as it is, and try to fit in the bench. Hopefully I can put that finisching layer on it as soon as possible. As for now, I'll install it like it is to save some space.
As it turns out, I forgot to measure te hinges of the bench... A litlle dremel action was needed to make the benc fit.


As you can see, it is flush with the bin and the other cabinet! Wondering what Wolf thinks about his adapted resting area.


Think he will like it ;-)

Multi-purpose... temporary storage for DIY-tools


Productive day I'd say. Glad I pulled it all off in one day! Think the skill-level is rising as well. Next project: TBD

Project Nr 7, Tilt Out Garbage Bin, Part 3

Due to a flat tyre, I was stuck home today... and the weather is fine! So Finish of the bin ;-)
First thing today is assembling the front panel. Using the new ryobi combo saw, miter cuts are made easy. Need some excercise though...


So, that will fit just tight. Now the boards to make a nice front panel. Hope it will all be flush and right...


It fits! tight, almost flush, and almost right... but hey, that's part of the concept of building with pallet wood I guess.
Installing the hinges, and screwing on a bottom-panel as a support for the garbagebag. Forgot to take detailed pictures of that part... I also mounted a little handle to hang the bag on.


Nice! First time ever to build a cabinet like sturcture. Not to bad at all. Need to improve my skills a litlle more to more precise. But it's all a very good learning process ;-)
Finishing off with woodlovers teak oil spray, to give it some protection and making the grain stand out some more.


The first layer dried in 5 minutes, so I gave a second one. Finishes off just nice.
And does it fit in my utility room? 


Flush with the existing cabinet!
A little help and approval from Wolf ;-)


Oh Yes! it fits and it works as well!

Wednesday, March 1, 2017

Project Nr 7: Tilt Out Garbage Bin, Part 2

Yes, no raining today. Started of with the frame from 4.5x4.5. Cutting them at length. I needed the cabinet to be 88cm to make it flush with the existing workingtop that's installed in my utility room.


This time I used pocket holes to do the joinery. Not a bad idea I guess, and rather easy to do with the right jig. (thanks to Wolfcraft).

With part of the frame allready jointed, I started with mounting the palletwood boards. First the back panel, followed by the side panels.


Starts to look like a real cabinet! Due to the lovely Belgian weather, I needed to put everything inside... again. Just as I had all my stuff inside, I had to rush to the firestation... (chimney fire call)
I just had some time left over to put the top panel in his place before bedtime... ;-)